
Email capture popups on WordPress are one of the fastest ways to grow your subscriber list — if you set them up the right way.
I’ve spent years testing popup campaigns across different WordPress sites, and the pattern is always the same: most people set up a popup, see low conversions, blame the tool, and move on.
In this guide, I’ll walk you through what email capture popups are, the tools you can use, how to set them up, and what actually makes them convert.
What Is an Email Capture Popup on WordPress & Do They Work?
Its goal is to turn website visitors into subscribers by offering something valuable in exchange, like a discount, guide, or newsletter.
Unlike static forms hidden in sidebars or footers, popups show up at the right moment, like when someone is about to leave, has scrolled through your content, or has spent some time on the page. That timing is what makes them far more effective for capturing attention.
Do they actually work? Yes, but only when used thoughtfully. According to HubSpot’s marketing statistics report in 2026, the average eCommerce website conversion rate is under 2%, while top-performing websites convert significantly higher through optimized user experiences and lead capture strategies. The difference comes down to how you use them.
Popups that appear too early, feel intrusive, or offer no clear value tend to get ignored or even hurt your user experience. On the other hand, when you trigger them after engagement, keep them non-intrusive on mobile, and offer something relevant, they consistently become one of the most reliable ways to turn visitors into subscribers.
5 Popular WordPress Plugins to Add Email Capture Popups
After trying out multiple plugins for popup email capture on WordPress and studying what users really care about, I’ve handpicked the ones that actually make email capture simple and effective.
These tools load fast, don’t wreck your site’s performance, and are easy to set up even if you’ve never touched code. They integrate smoothly with email platforms like Mailchimp and ConvertKit, keep you GDPR-compliant, and create popups that feel natural.
Before diving into the plugins, here’s a quick overview:
| Tool | Best For | Price | Rating |
|---|---|---|---|
| Picreel | Boosting Leads, Conversions, and Sales | Forever free up to 5k visitors. Paid starts at $9.99/month | 4.9/5 (Capterra), 4.5/5 (G2) |
| FireBox | Advanced Targeting and Personalized Popups | From €50.15/year | 4.9/5 (WordPress.org) |
| Poper | Lightweight, Beginner-Friendly Popups | From $7/month | 4.9/5 (G2) |
| Bloom | Beautifully Designed Email Opt-Ins | From $7.42/month | 4.5/5 (G2) |
| Hustle | All-In-One Marketing and Lead Capture | From $5/month | 4.4/5 (WordPress.org) |
1. Picreel – Best for Boosting Leads, Conversions, and Sales
I’ve been using Picreel to capture leads and engage visitors right when they’re about to leave, and it’s easily one of the most feature-packed popup tools I’ve tried. I love how effortlessly it adapts to user behavior, whether someone’s scrolling, pausing, or showing exit intent. This helps me trigger the perfect message at the perfect time.
Its AI-powered popup builder lets you create intelligent, behavior-aware campaigns in minutes just by giving a prompt about your popup specifications.
The pre-built templates make designing popups feel easy, even for non-designers, and the analytics dashboard helps me see exactly which campaigns are performing best. From building lead forms to offering discounts or collecting feedback, Picreel gives me everything I need to convert traffic without relying on developers.
Pros:
- Picreel’s AI-powered popup builder creates intelligent, behavior-aware campaigns without any coding required.
- AI-powered exit intent technology detects mouse movement and browsing patterns to trigger popups just before a visitor leaves, not after
- Professionally designed popup templates for different campaign goals
- Detailed analytics and A/B testing to track and improve conversions
- Connects seamlessly with over 700 tools, including Mailchimp, HubSpot, and Shopify
Cons:
- Currently doesn’t offer a dark mode, though the clean interface is easy to navigate
- Dedicated account support is limited to paid plans, but the free plan still comes with helpful self-service resources and guides
Price: Offers a forever-free plan for up to 5K visitors (For WordPress, you may need the Enterprise account). Paid plans start at $9.99/month.
Let’s look at how Grivy, a customer service marketplace, solved its lead capture problem and boosted conversions.

2. FireBox – Best for Advanced Targeting and Personalized Popups
FireBox is one of those plugins that completely changed how I approach email capture on WordPress. Instead of showing the same popup to everyone, I can personalize each campaign based on how visitors interact with my site.
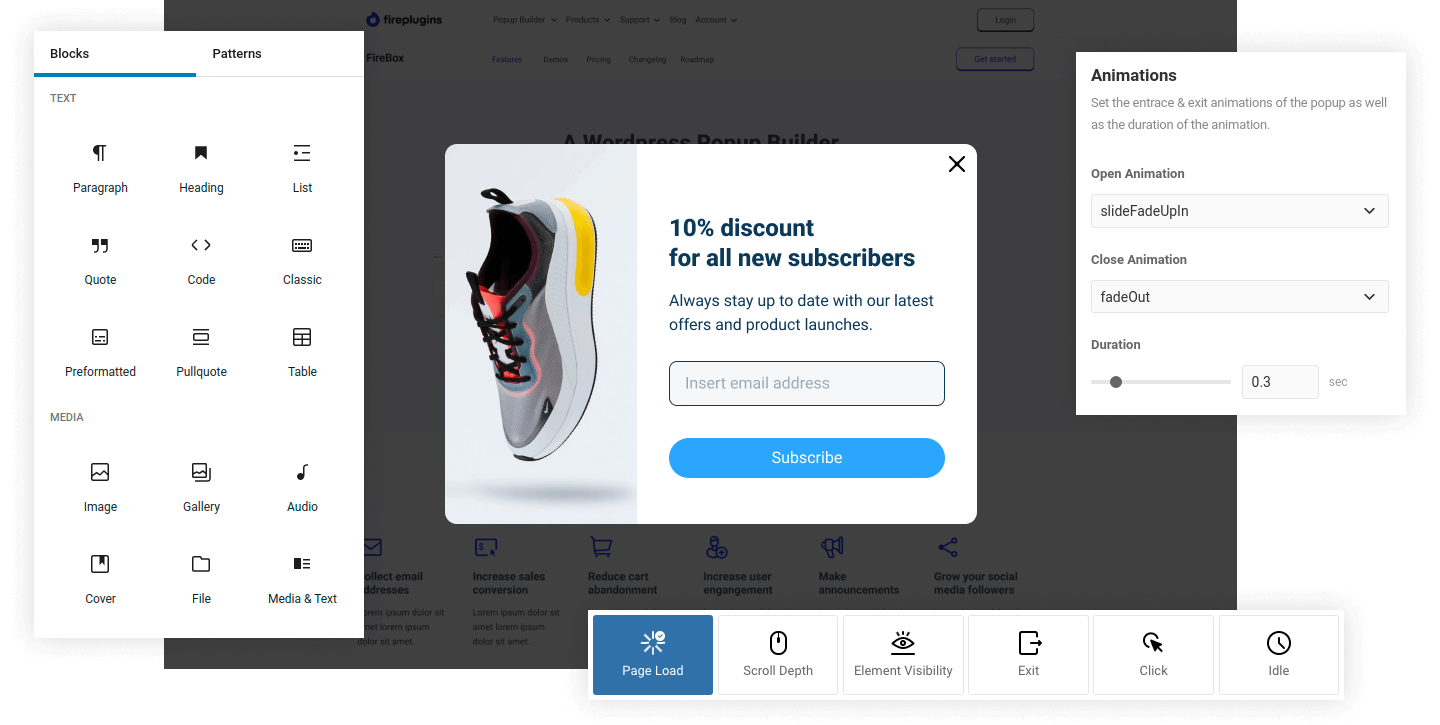
For example, I can display a discount signup form when someone scrolls halfway through a product page, or catch visitors with an exit intent email opt-in just before they leave.
The Gutenberg-based builder makes it simple to design engaging popups that match my site’s style without any code or hassle. What I really appreciate is how FireBox lets me segment audiences with pinpoint accuracy, so each message feels tailored and relevant rather than random.
Pros:
- Versatile popup types like full-screen overlays, floating bars, and slide-ins
- Smart triggers that respond to user actions such as clicks, scrolls, and idle time
- Detailed analytics to measure engagement and optimize conversions
- Professionally designed templates with smooth animation effects for a polished look
Cons:
- Some of the advanced targeting options are locked behind the Pro version
- The range of features might feel overwhelming at first, though it becomes easier with use
Price: Starts at €50.15/year
3. Poper – Best for Lightweight, Beginner-Friendly Popups
When I first started experimenting with email capture popups, I wanted something simple but effective, and that’s exactly what Poper delivers. It’s lightweight, clean, and incredibly beginner-friendly, yet still offers smart, AI-powered popups that trigger at just the right moment.
I can easily build exit-intent popups, promotional banners, or gamified lead forms with its drag-and-drop builder, all without slowing down my site. I’m genuinely impressed by how natural the popups feel and how they blend beautifully with my site design instead of interrupting it.
Pros:
- AI-powered popups that adapt to visitor behavior for better engagement
- Ready-to-use templates and drag-and-drop editing for quick email capture setup
- Built-in analytics to track conversions and improve popup performance
- GDPR-compliant and fully responsive on all devices
Cons:
- Limited customization flexibility compared to advanced popup builders
- Some integrations and AI targeting features may require an upgrade
Price: Starts at $7/month
4. Bloom – Best for Beautifully Designed Email Opt-Ins
If there’s one plugin that makes email capture feel like part of your brand’s design, it’s Bloom. I love how effortlessly it turns sign-up forms into elegant, on-brand experiences. With over a hundred pre-made templates, Bloom lets me create popups, fly-ins, or inline forms that actually look good and not like intrusive ads.
I can even set triggers like “after commenting” or “after purchasing” to make the timing feel organic and relevant. Its detailed targeting settings let me display different offers on specific pages or posts, which makes growing my email list feel strategic, not random.
Pros:
- Six display types, including popups, fly-ins, and inline forms for flexible placement
- 100+ customizable templates with full control over colors, borders, and layout
- Targeted display rules to show unique forms on specific posts or categories
- Built-in A/B testing and analytics to track which opt-ins perform best
Cons:
- Can feel slightly heavy on slower sites due to design-rich templates
- Doesn’t offer a free version; available only with the Elegant Themes membership
Price: Starts at $7.42/month
5. Hustle – Best for All-In-One Marketing and Lead Capture
Hustle feels more like a full-fledged marketing partner than just a popup plugin. I love how it lets me create everything from elegant email opt-ins and exit intent popups to slide-ins and social share bars right inside WordPress. The customization options are extensive, but it still feels easy to use even for someone who doesn’t code.
Hustle stands out because it combines lead generation with engagement tools. I can set triggers based on user behavior, schedule popups to show at the perfect moment, and monitor performance from one clean dashboard.
Pros:
- Includes popups, slide-ins, embedded opt-in forms, and social share bars
- Behavior-based triggers like exit intent, scroll depth, and inactivity
- Built-in analytics and scheduling to optimize popup timing and conversions
- Fully GDPR-ready with spam protection via Google reCAPTCHA
Cons:
- Free version limits the number of campaigns you can run simultaneously
- Advanced automation and targeting require upgrading to the Pro plan
Price: Starts at $5/month
Evaluation Criteria
When I was putting this list together, I didn’t just look at which tools are popular. I approached it like I was choosing a marketing assistant for my own site. Something that actually fits into my workflow and helps me grow without adding friction.
Here’s exactly what I paid attention to:
- Website size and traffic: I’ve worked with both small blogs and higher-traffic sites, and the needs are very different. For smaller sites, I leaned toward lightweight, easy-to-launch tools. For larger sites, I prioritized tools that can handle advanced targeting without slowing things down.
- Design flexibility: This was a big one for me. I don’t want to rely on a developer every time I tweak a headline or button. So I looked for tools that let me quickly customize popups to match the brand without overcomplicating the process.
- Email integrations: I ensured every tool integrates smoothly with platforms like Mailchimp, HubSpot, and Klaviyo. If leads don’t flow directly into your email system, it just creates unnecessary manual work.
- Budget and scalability: I’ve seen tools that look affordable at first but become limiting as you grow. So I focused on options that can scale with you, without forcing you to switch platforms later.
- Ease of use: If a tool feels confusing, it rarely gets used properly. I picked tools that are simple enough to set up and manage consistently, especially for teams that don’t want a steep learning curve.
- Analytics and A/B testing: For me, this is non-negotiable. I wanted tools that show what’s working and what’s not. Without testing and data, you’re just guessing.
- Real user feedback: Before finalizing anything, I checked what actual users were saying. Reviews often reveal things you won’t find on feature pages, especially around reliability and support.
How to Create an Email Capture Popup on WordPress
By the end of these steps, you’ll have a live, behavior-triggered popup running on your WordPress site that collects emails, connects to your email platform, and stays GDPR-compliant without touching a line of code.
I’m using Picreel as the example here because it covers behavioral targeting, integrations, and compliance in one place.
Step 1: Define Your Conversion Goal First
Before I even open a WordPress popup plugin, I decide exactly what I want the popup to achieve.
Every popup should have one clear goal. Not multiple.
For email popups, that usually means:
- Growing my email list
- Offering a lead magnet
- Capturing subscribers at the right moment
The key thing I’ve learned is this: the goal directly decides the popup type, trigger, and offer. If I get this wrong, the entire campaign underperforms.
If I’m unsure, I quickly use this prompt:
“I run a [type of business]. My goal is [goal]. My target audience is [audience]. Suggest the best popup type, trigger, and offer ideas.”
Step 2: Install and Connect a WordPress Popup Plugin
Once my goal is clear, I head to my WordPress dashboard:
Plugins → Add New → Search for a popup plugin → Install → Activate
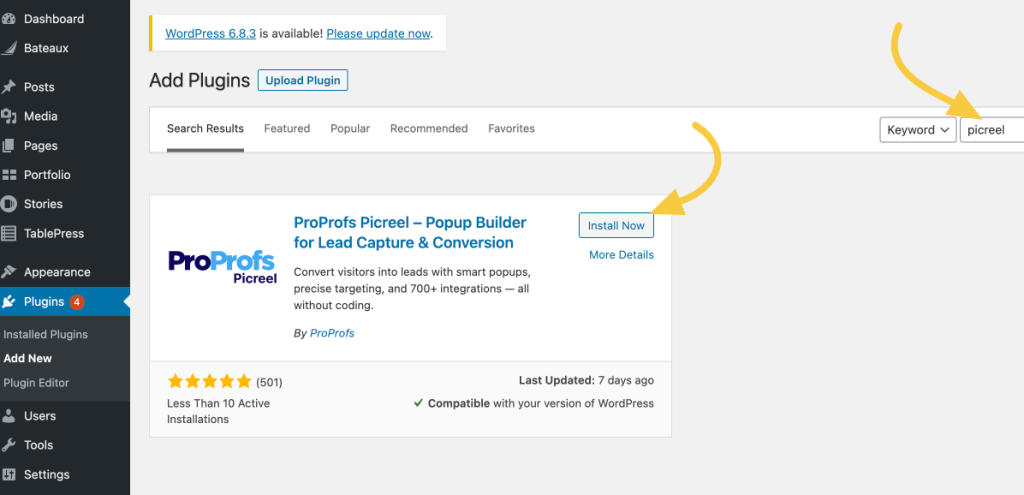
After activating, I sign in and connect the tool.
The good part is I don’t have to deal with code, scripts, or theme edits. Most plugins handle everything in the background, so setup stays quick and clean.
Step 3: Create Your Email Popup Campaign
Now I move to the plugin dashboard and create a new campaign.
Most tools give me two easy ways to start:
- AI-based setup: I enter my website and goal, and it builds a ready-to-use popup
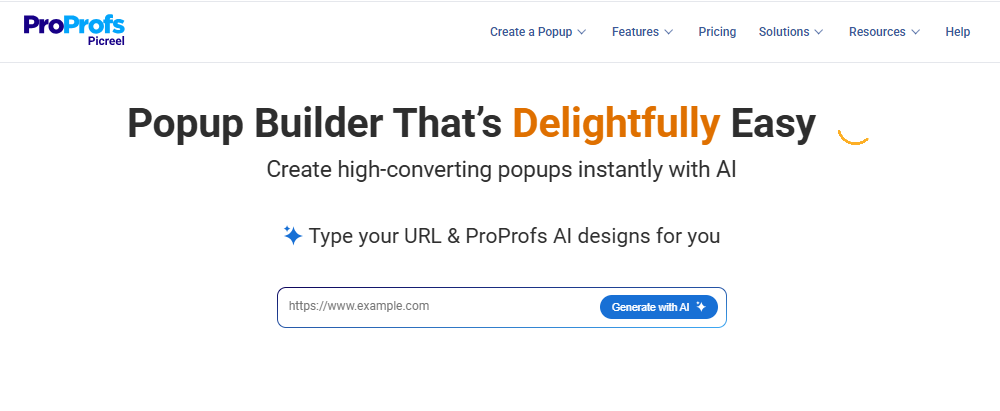
- Template library: I pick a design like a lightbox, slide-in, or full-screen popup

Since my focus is email capture, I stick with simple, clean popup formats.
From experience, the popups that work best are the ones that feel helpful and relevant, not pushy or distracting.
Step 4: Customize the Popup Design
This is where your popup takes shape. A good email popup design looks clean, reflects your brand, and doesn’t feel like a roadblock.

- Background and contrast: Go for a white or light background with high-contrast CTA buttons — navy, forest green, or your brand’s primary color. The button should be impossible to miss.
- Form fields: Name and email are the sweet spot. Every additional field you add reduces conversion rate. If segmentation matters, add one checkbox option like “What topics interest you most?” rather than a third text field.
- CTA copy: Drop generic text like “Subscribe” or “Submit.” Use action-based copy that reflects what the visitor receives: “Send Me the Guide,” “Get My Discount,” “Yes, I Want Updates.” The more specific the promise, the higher the opt-in rate.
- Close button: Always place it visibly in the top-right corner. A hidden or hard-to-find close icon creates frustration, not conversions.
- Fonts and sizing: Legible fonts like Open Sans or Lato at 16–18px for body text, 20–22px for your CTA. Anything smaller becomes a UX problem on mobile.
- Animation: A gentle fade-in beats a jarring bounce or slide. The smoother the entrance, the less it disrupts the reading experience.
- Mobile compliance: Keep your popup under 30% of the viewport on mobile. Google actively penalizes pages where popups block content on small screens. Test on a real device, not just a browser preview.
Once everything aligns with your brand, click Save.
Step 5: Configure Popup Triggers and Targeting
This is the step most people underinvest in, and it’s where the real conversion difference is made. Timing and targeting are what separate a popup that feels helpful from one that feels like spam.
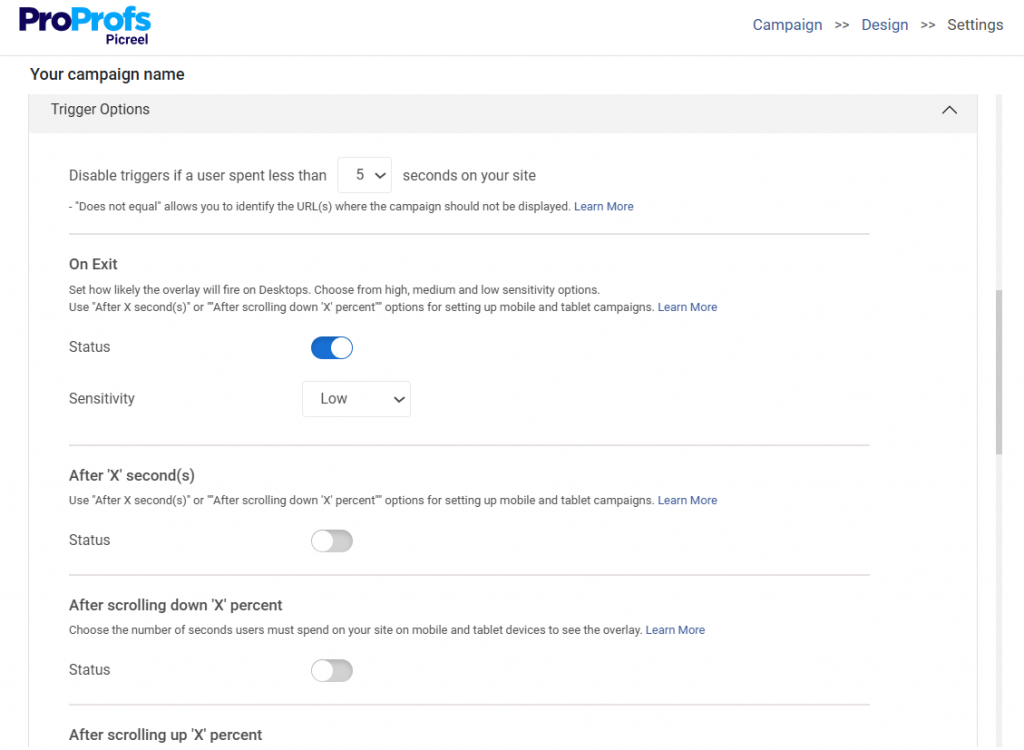
Popup triggers to use:
- Exit intent: Catches visitors who are about to leave. Picreel’s AI-driven exit intent analyzes mouse movement, browsing rhythm, and scroll velocity to predict abandonment before it actually happens, so the popup fires at precisely the right moment, not too late.
- Scroll depth (50%+): Show the popup after a visitor scrolls at least halfway down the page. At that point, they’ve read enough to be genuinely interested. Triggering at 20–30% scroll is too early and reads as an interruption.
- Time delay (8–12 seconds): Let the visitor settle in before anything appears. Eight seconds is usually enough for someone to form an impression of the page. Less than five seconds is the most common timing mistake I see.
- On-click: Ideal for sidebar CTAs, inline blog links, or buttons that say “Get the free checklist.” The visitor opts in through intent rather than surprise.
Targeting rules to configure:
- Show to new visitors only, or create a separate, more personalized offer for returning visitors
- Use geo-targeting for location-specific campaigns “Get deals delivered to your inbox, [City] readers” converts better than a generic message for regionally-focused businesses
- Target specific pages like a popup about email marketing tips should only appear on content related to email marketing, not on your pricing or checkout page
- Set impression frequency to once per session. Showing the same popup to someone multiple times in one visit is one of the fastest ways to lose their trust.
- Suppress the popup for users who have already subscribed. Most tools handle this with a simple cookie rule. Just set it and forget it.
If you have EU visitors, add a consent checkbox to your email popup and keep it unchecked by default to stay GDPR-compliant. Also, use double opt-in so subscribers confirm their email, which improves list quality and deliverability.
After configuring your settings, hit Save.
Step 6: Connect to Your Email Platform and Go Live
This is the step most tutorials rush through, but getting your integration right from day one saves hours of manual work later.
Picreel connects natively with over 700 tools, including Mailchimp, HubSpot, Klaviyo, Constant Contact, and ActiveCampaign.

The setup is straightforward: go to the Integrations tab, select your email platform, authenticate with your API key, and map your form fields to the correct list or audience segment in your ESP.
A few things worth doing at this stage before you hit publish:
- Tag new subscribers at the source: Most email platforms like BIGContacts let you apply a tag when someone joins via a specific form. Use tags like “wordpress-popup,” “exit-intent,” or “blog-subscriber” so you can segment and message them differently from leads that came through other channels.
- Set up a welcome sequence before you launch: A subscriber who signs up and hears nothing for two weeks is a subscriber who marks you as spam. Even a two-email welcome sequence — one immediate delivery of the offer they signed up for, one follow-up three days later — dramatically improves early engagement rates.
Here’s a clean AI prompt you can use:
| “Create a 2-email welcome sequence for new subscribers who signed up through a WordPress email popup. The first email should deliver the promised offer immediately and build trust. The second email should be sent after 3 days, focusing on engagement, value, and encouraging the next action. Keep the tone friendly, concise, and personalized for [target audience] in [industry]. Include subject lines and clear CTAs.” |
- For multi-site setups: If you’re running the same popup tool across multiple WordPress domains, check that your plan supports it. Most platforms limit active domains on entry-level tiers.
Once your integration is confirmed and your welcome sequence is ready, publish the campaign.
Step 7: Track, Test, and Improve
Your first popup won’t be your best one. The sites I’ve seen grow their email lists the fastest treat their popup as a living campaign, not a set-it-and-forget-it installation.
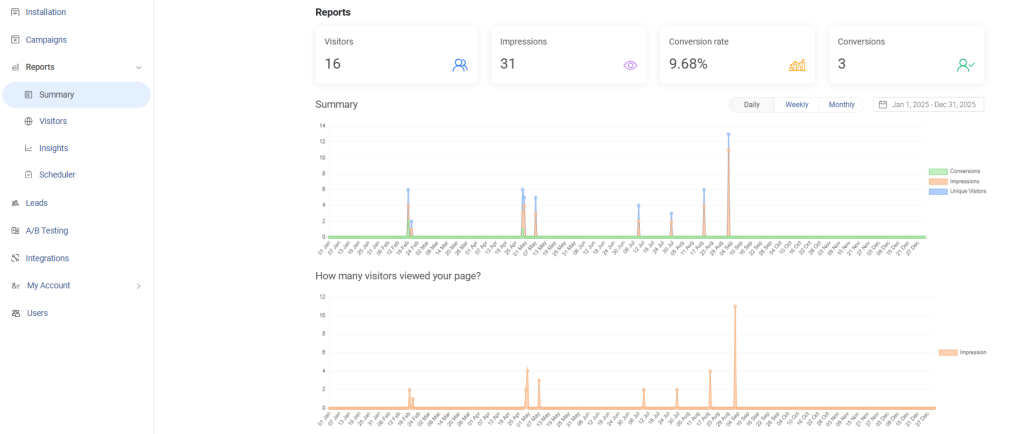
- Monitor views, clicks, and form submissions weekly. A drop-off between impressions and clicks usually signals a copy or offer problem. A drop-off between clicks and submissions usually signals a form friction or trust issue.
- Run A/B tests on one variable at a time: headline, CTA text, trigger timing, or offer type. Testing two variables simultaneously makes it impossible to know what drove the change.

- Track conversion rates by page. A popup converting at 6% on your blog posts and 1% on your product pages is telling you something specific about what visitors on each page are ready for.
- Refresh your popup content every six to eight weeks. Returning visitors develop “popup blindness” to an offer they’ve seen multiple times. A new headline or updated visual resets that.
FREE. All Features. FOREVER!
Try our Forever FREE account with all premium features!
Which Popup Offers Actually Get People to Subscribe?
The trigger and design get the popup in front of your visitor. The offer is what determines whether they hand over their email address.
I’ve tested this across multiple campaigns, and generic offers consistently underperform specific ones. “Subscribe to our newsletter” converts poorly because it communicates work for the visitor with unclear benefits.
“Get our weekly roundup of conversion rate optimization tips, free.” converts better because it’s specific about what arrives, when, and what it costs them.
Offers that consistently convert well:
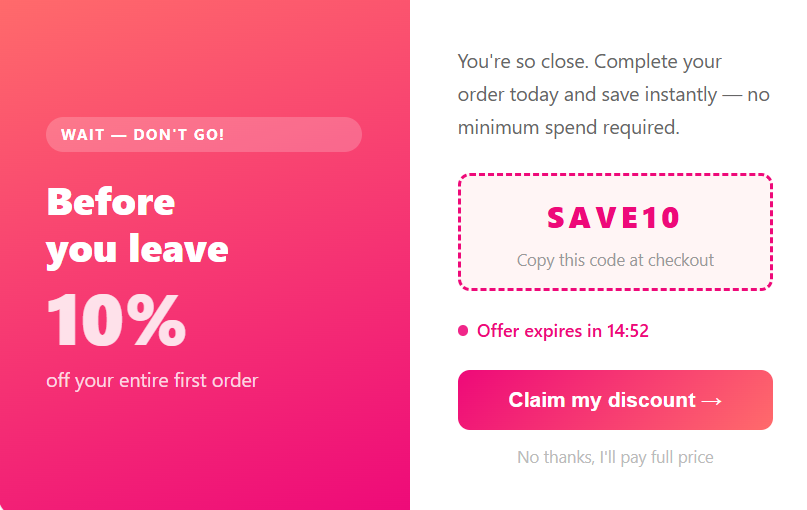
1. Discount Codes for E-Commerce
“Get 10% off your first order” is one of the highest-converting popup offers available for WooCommerce stores. The value is immediate and unambiguous. Pair it with a short countdown timer for a real, time-limited sale, and conversions go up further.
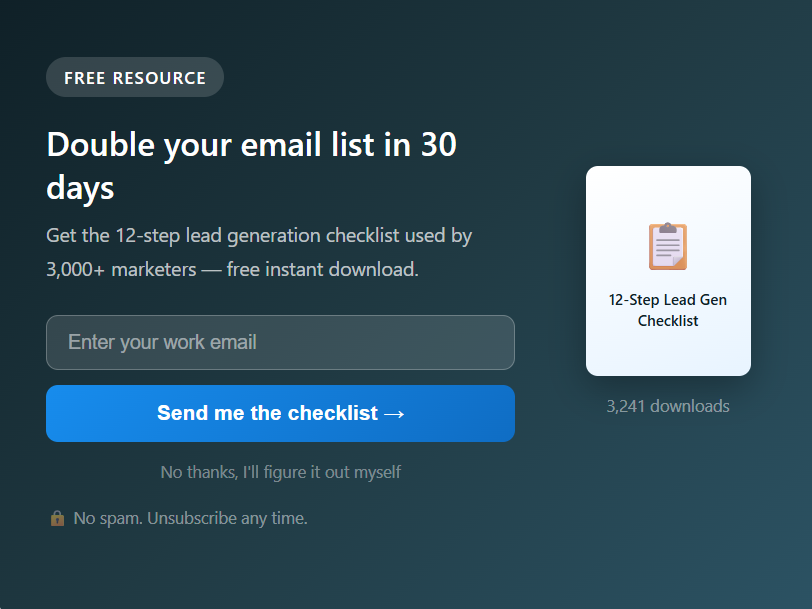
2. Content Upgrades
A checklist, template, or PDF version of what the visitor is already reading. If someone is halfway through your guide on email marketing, a content upgrade popup offering “Download the Email Campaign Checklist” converts dramatically better than a generic newsletter pitch because the offer matches their exact current interest.
3. Free Resources
Ebooks, toolkits, swipe files. These work well in B2B and SaaS contexts where the audience is in research mode.

4. Early Access or Exclusivity
“Join the list to get early access to new features” works well for SaaS products and product launches. It costs nothing to offer and creates a sense of insider access.

Email Popup Best Practices That Actually Improve Conversions
From what I’ve tested, small changes in copy, offer, and timing can make a huge difference in how your popups perform. Here are a few best practices I always follow:
| Area | What Works | What Doesn’t |
|---|---|---|
| CTA Copy | “Send Me the Checklist”, “Get My Free Template” | “Submit”, “Sign Up” |
| Microcopy (Yes/No) | “Yes, I want the guide” / “No thanks, I’ll pass” | Only one generic CTA with no alternative |
| Offer Relevance | Checklist on a blog post about the same topic | Generic “Subscribe to newsletter” everywhere |
| Value Proposition | “Get a free SEO audit checklist” | “Enter your email for updates” |
| Urgency | Real limited-time offer or expiring discount | Fake countdown timers that reset |
| Social Proof | “Join 12,000+ marketers” | “Trusted by many users” |
| Timing | Trigger after scroll, time, or exit intent | Popup immediately on page load |
| Optimization | A/B testing headlines, CTAs, timing | Set once and never updated |
Turn Your WordPress Traffic Into Consistent Email Growth
Growing your email list on WordPress comes down to three things: showing the right offer to the right visitor at the right moment. The tools in this guide give you everything you need to make that happen without writing a line of code.
If you’re starting today, keep it simple. Pick one tool, set up a single exit intent popup with a specific offer tied to your most-visited content, connect it to your email platform, and let it run for two weeks before changing anything.
Small, focused campaigns with clear goals consistently outperform complex setups that never get tested properly.
If you want a tool that handles AI-driven targeting, deep integrations, and A/B testing in one place, Picreel is worth starting with. The free plan is enough to validate your first campaign without any upfront cost.
Choose one popup tool from this list, create your first email capture popup today, connect it to your email platform, and start turning your traffic into subscribers within the next 24 hours.
Frequently Asked Questions

Can I show a different popup offer to returning visitors versus new ones?
Yes, tools such as Picreel let you segment by visitor type in the campaign targeting settings. A common approach is to show a first-visit discount to new visitors and a "join the community" or loyalty message to returning ones. The rule is typically set using cookie or session data.
Does adding a popup slow down my WordPress site?
It can if the popup script loads synchronously and blocks page rendering. To avoid this, choose tools like Picreel that load scripts asynchronously and check your Core Web Vitals in Google Search Console after launching. LCP and INP are the metrics most likely to be affected.
How do I stop my popup from showing to people who already subscribed?
Most tools handle this through cookies. Once someone submits the form, a cookie suppresses the popup on future visits. For more reliable suppression across devices, connect your popup tool like Picreel to your email platform and use a custom audience exclusion rule to hide the popup from users already on your list.
What is the difference between an exit intent popup and a scroll-depth popup?
An exit intent popup fires when the visitor's behavior signals they are about to leave, typically detected through mouse movement toward the browser close button or back arrow. A scroll-depth popup fires after the visitor scrolls a set percentage down the page, usually 50%.
Can I use email capture popups on WooCommerce product pages?
Yes, and product pages are among the highest-converting locations for email capture when the offer is right. A discount popup like "Get 10% off this product when you subscribe" works well for first-time visitors on product pages. Use page-level targeting in your popup tool to show the offer only on product pages, not on checkout or thank-you pages.
FREE. All Features. FOREVER!
Try our Forever FREE account with all premium features!
 We'd love your feedback!
What did you like & how can we make it even better?
 Thanks for your feedback!
 Ask Your Question
Have a question? Get expert help to make your decision easier.