
I have set up popups on more WordPress sites than I can count, and the conversation always circles back to the same frustration. Plugins slow your site, break after updates, cap you on the number of domains, and charge you more the moment you need a feature that actually matters.
Most people searching for how to add a popup in WordPress without a plugin are not beginners. They have already been through the plugin cycle. They want something faster, cleaner, and more scalable.
In this guide, I cover two methods. The first is using a WordPress plugin, which gives you a no-code popup builder with advanced triggers, targeting, and email integrations built right in.
The second is building a popup entirely from scratch using HTML, CSS, and JavaScript inside your theme files, with no tool dependency whatsoever. Both are practical. Both work. The right choice depends on how much control and speed of deployment you need.
Method 1: How to Add a WordPress Popup Using a Popup Plugin
This is the method I use for any client site where speed and fast deployment matter. Picreel works as a WordPress plugin, and unlike most bloated popup plugins, it loads as a lightweight JavaScript snippet asynchronously, meaning it does not block your page rendering or drag down your Core Web Vitals score.
By the end of these steps, you will have a live, behavior-triggered popup running on your WordPress site that collects leads, connects to your email platform, and stays GDPR-compliant without touching a single line of code.
Step 1: Define Your Conversion Goal First
Before I even open a WordPress popup plugin, I decide exactly what the popup needs to achieve. One goal. Not multiple.
That goal directly decides the popup type, trigger, and offer you build. Get this wrong and the entire campaign underperforms regardless of how good the design looks.
For most WordPress sites, the goal is one of these:
- Growing an email list through lead capture
- Recovering abandoning visitors on product or cart pages
- Promoting a time-sensitive offer or content upgrade
- Capturing feedback through a survey popup
If you are unsure which goal fits your current traffic, use this prompt before opening Picreel:
“I run a [type of business]. My goal is [goal]. My target audience is [audience]. Suggest the best popup type, trigger, and offer ideas.”
I have used this framing dozens of times before building campaigns for clients, and it consistently cuts setup time in half.
Step 2: Install Picreel and Connect It to WordPress
Go to your WordPress dashboard, navigate to Plugins, click Add New, and search for Picreel. Install and activate it. Once activated, sign in to your Picreel account from the plugin dashboard and connect your site.
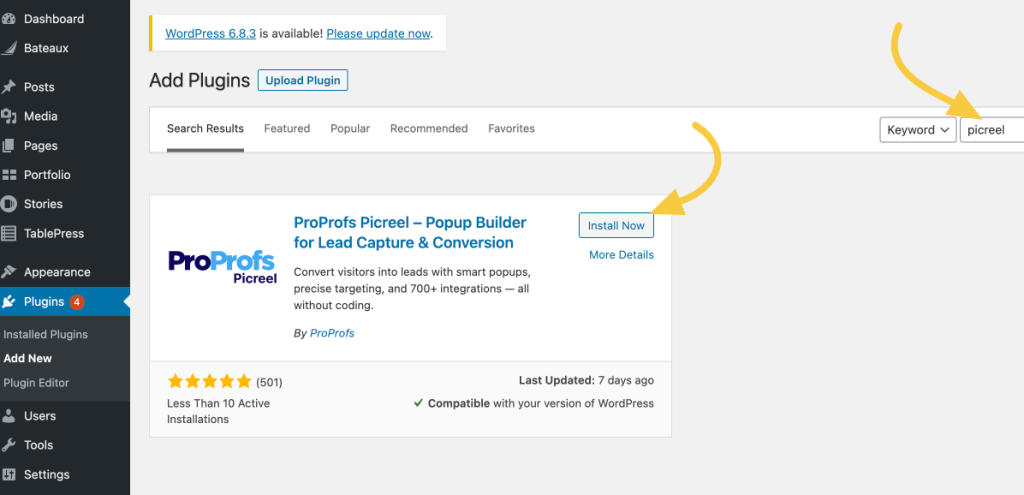
No theme edits. No script tags. No manual code injection. Picreel handles everything in the background, so the setup stays clean and fast.
Step 3: Create Your Popup Campaign
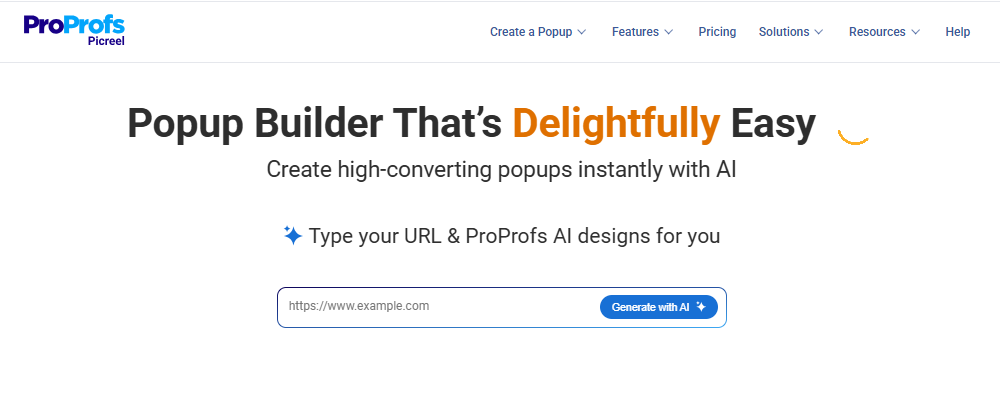
Inside the Picreel dashboard, create a new campaign. You have two paths depending on how quickly you want to move:
- AI Popup Builder: enter your website URL and campaign goal. Picreel’s AI generates a ready-to-use popup with a layout, copy, and CTA matched to your objective. This is the fastest starting point I know of.
- Template library: choose from 100+ templates covering lightbox popups, slide-ins, nanobars, full-screen overlays, exit surveys, and more. Pick the format that fits your goal and edit from there using the Drag and Drop Popup Builder.

I always start with a single, clear goal. If I am working on a product page, the goal is usually cart abandonment recovery. On a blog post, it is an email capture. A popup that tries to accomplish two things at once splits attention and converts poorly.
Step 4: Customize the Popup Design
A good popup design looks clean, reflects your brand, and does not feel like a roadblock. Here is what I pay attention to at this stage:
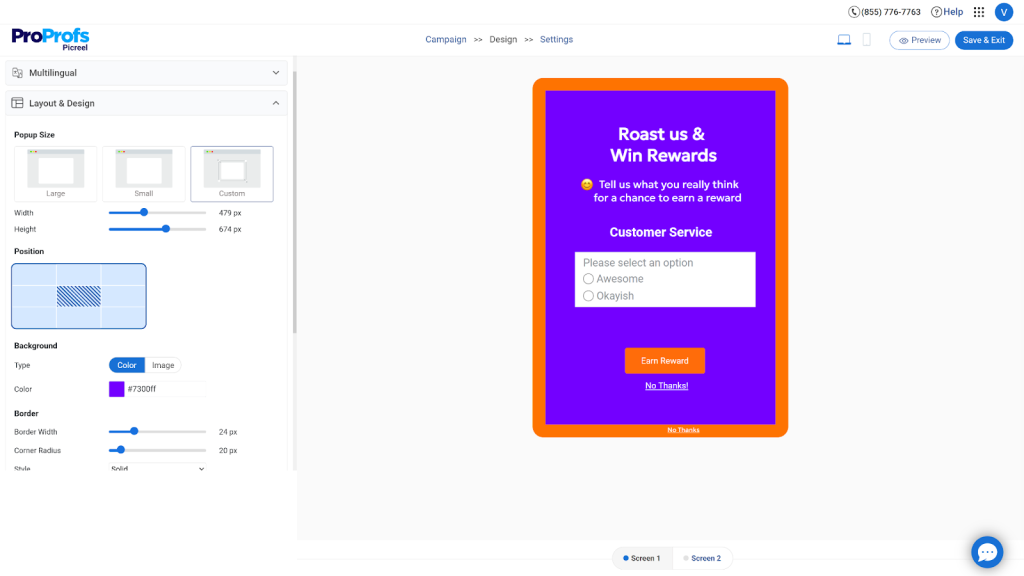
- Background and contrast: Go for a white or light background with a high-contrast CTA button in your brand’s primary color. The button should be impossible to miss.
- Form fields: Name and email are the sweet spot. Every field you add beyond email reduces your opt-in rate. If segmentation matters to you, add one checkbox option like “What topics interest you most?” rather than a third text field.
- CTA copy: Drop generic text like “Subscribe” or “Submit.” Use action-based copy that reflects exactly what the visitor gets. “Send Me the Guide,” “Get My Discount,” “Yes, I Want In” consistently outperform vague CTAs because the promise is specific.
- Close button: Always place it visibly in the top-right corner. A hidden close icon creates frustration, not conversions.
- Mobile compliance: Keep your popup under 30% of the viewport on mobile. Google actively penalizes pages where popups block content on small screens. Test on a real device, not just a browser preview.
- Animation: A gentle fade-in beats a jarring bounce or slide. The smoother the entrance, the less it disrupts the reading experience.
Once everything looks right, click Save.
Step 5: Configure Triggers and Targeting Rules
This is the step most people underinvest in, and it is where the real conversion difference is made. Timing and targeting are what separate a popup that feels helpful from one that feels like spam.
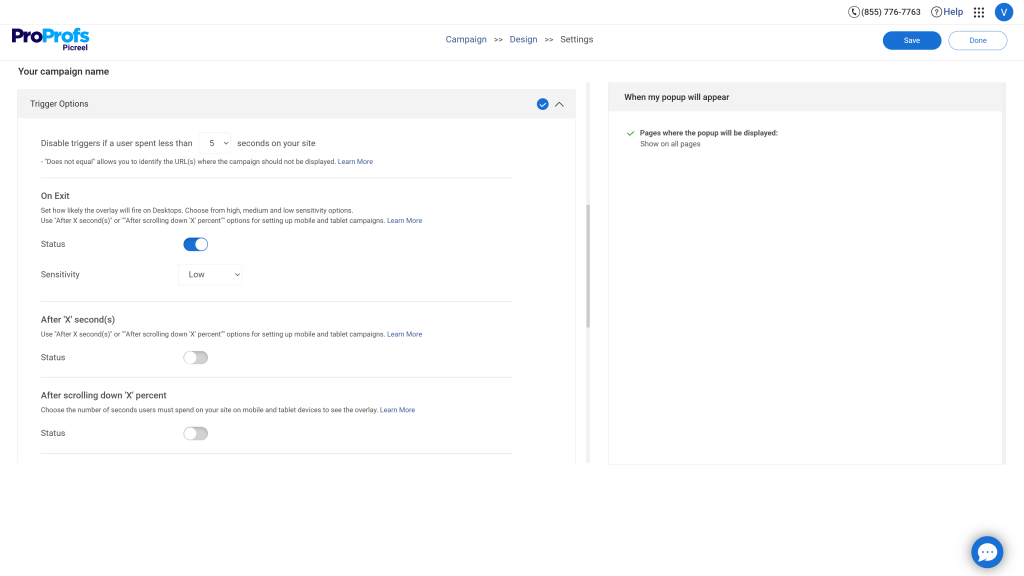
Popup triggers to use:
- Exit Intent Triggers: fires when a visitor moves their cursor toward the browser tab, signaling they are about to leave. Picreel’s exit intent analyzes mouse movement, browsing rhythm, and scroll velocity to predict abandonment before it happens, so the popup fires at precisely the right moment.
- Scroll depth (50% or more): show the popup after a visitor has scrolled at least halfway down the page. At that point, they have read enough to be genuinely interested. Triggering at 20% scroll is too early and reads as an interruption.
- Time delay (15 to 25 seconds): let the visitor settle in before anything appears. Less than five seconds is the most common timing mistake I see on client sites.
- On-click: ideal for sidebar CTAs or inline blog links that say “Get the free checklist.” The visitor opts in through intent rather than surprise.
Targeting rules to configure:
- Show to new visitors only, or create a separate, more personalized offer for returning visitors.
- Use geo-targeting for location-specific campaigns. “Get deals delivered to your inbox, [City] readers” consistently converts better than a generic message for regionally focused businesses.
- Target specific pages. A popup about an email marketing checklist should only appear on content related to email marketing, not on your pricing or checkout page.
- Set impression frequency to once per session. Showing the same popup to someone multiple times in one visit is one of the fastest ways to lose their trust.
- Suppress the popup for users who have already subscribed. Picreel handles this with a simple cookie rule.
Here are the frequency settings I use as a baseline:
| Setting | Recommended Value |
| Show popup after X seconds | 15 to 25 seconds |
| Frequency cap per visitor | Once every 7 days |
| Hide after form submission | Always |
| Exit intent delay after last shown | 3 days |
If you have EU visitors, add a GDPR consent checkbox to your popup form and keep it unchecked by default. Picreel has this as a built-in field option in the form builder. Pair it with double opt-in to improve list quality and deliverability.
Step 6: Connect Your Email Platform and Go Live
This is the step most tutorials rush through. Getting your integration right from day one saves hours of manual work later.
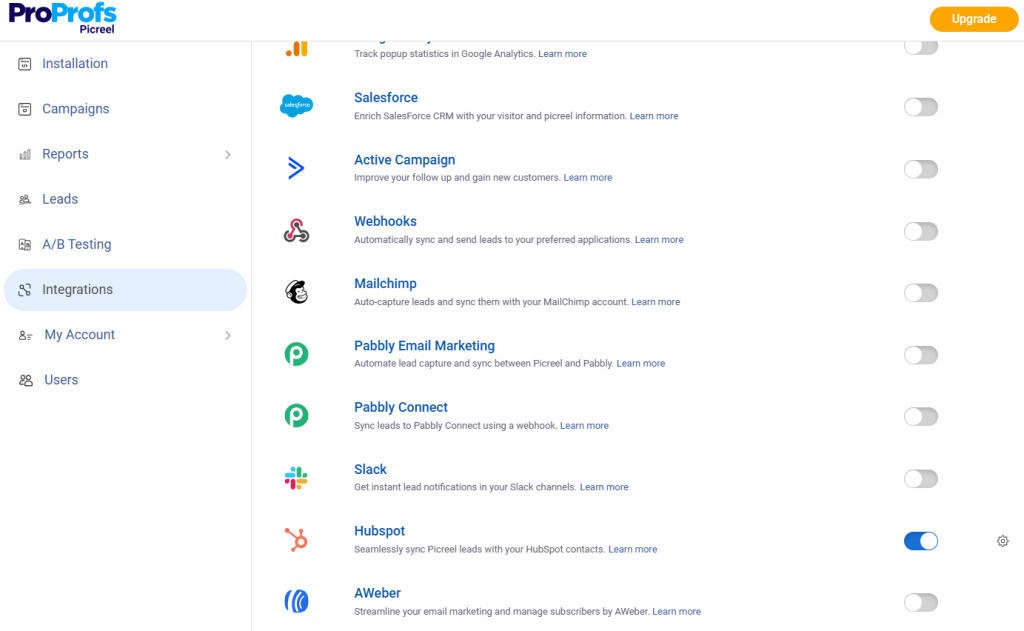
Go to the Integrations tab inside your Picreel campaign. Picreel connects natively with Mailchimp, Klaviyo, ActiveCampaign, HubSpot, Marketo, AWeber, Constant Contact, and 30+ other platforms.
Select your email tool, authenticate with your API key, and map your form fields to the correct list or audience segment.
A few things worth doing before you hit publish:
- Tag new subscribers at the source: apply a tag when someone joins via a specific popup campaign. Tags like “wordpress-exit-intent” or “blog-lead-magnet” let you segment and message these subscribers differently from leads that came through other channels.
- Set up a welcome sequence before you launch: a subscriber who signs up and hears nothing for two weeks is a subscriber who marks you as spam. Even a two-email welcome sequence makes a measurable difference to early engagement. Here is a prompt you can use to build one quickly:
“Create a 2-email welcome sequence for new subscribers who signed up through a WordPress popup. The first email should deliver the promised offer immediately and build trust. The second email, sent three days later, should focus on engagement, value, and encouraging the next step. Tone: friendly, concise, and personalized for [target audience] in [industry]. Include subject lines and clear CTAs.”
For multi-site setups: if you are running Picreel across multiple WordPress domains, confirm your plan supports it. One Picreel account can manage multiple domains from a single dashboard, which is far more scalable than managing separate plugin installations per site.
Once your integration is confirmed and your welcome sequence is ready, publish the campaign.
Step 7: Track, Test, and Improve
Your first popup will not be your best one. The sites I have seen grow their email lists the fastest treat their popup as a living campaign, not a set-it-and-forget-it installation.
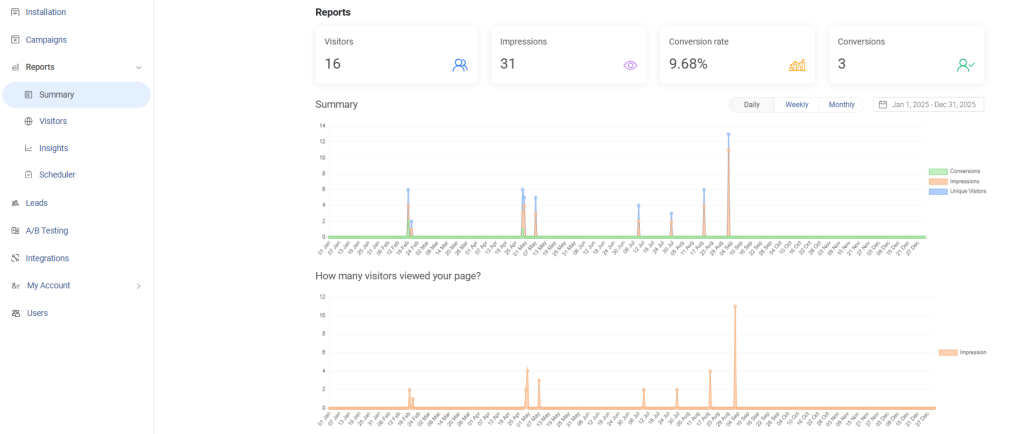
Monitor views, clicks, and form submissions weekly using Picreel’s Real-Time Analytics. A drop-off between impressions and clicks usually signals a copy or offer problem. A drop-off between clicks and submissions usually signals form friction or a trust issue.
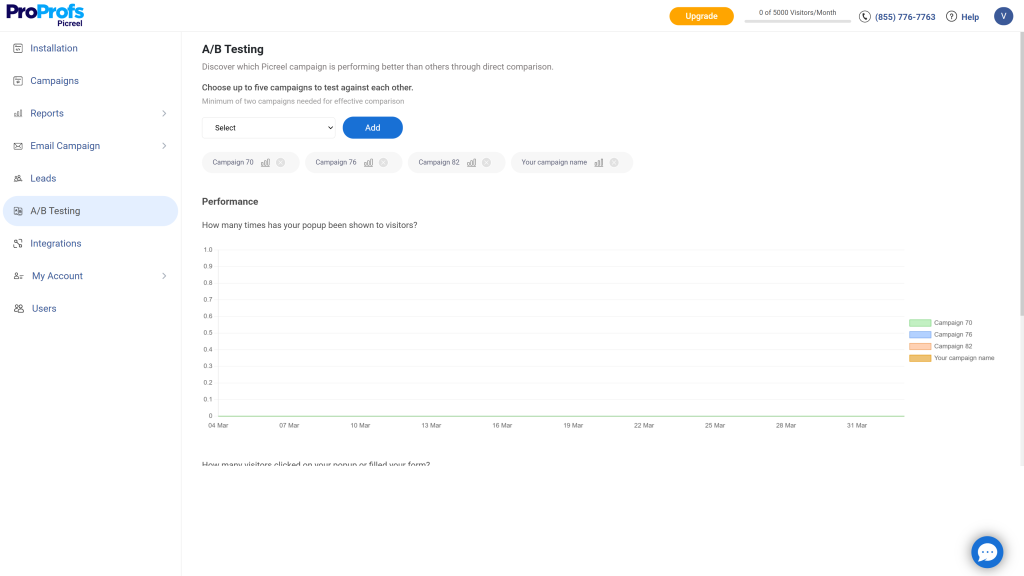
Use Picreel’s A/B Testing to run clean split tests on one variable at a time: headline copy, CTA text, trigger timing, or offer type. Testing two variables simultaneously makes it impossible to know what drove the change. I have seen headline changes alone move conversion rate by 20 to 40%.
Track conversion rates by page. A popup converting at 6% on blog posts and 1% on product pages is telling you something specific about what visitors on each page are ready for. Act on that data.
Refresh your popup content every six to eight weeks. Returning visitors develop popup blindness to an offer they have seen multiple times. A new headline or updated visual resets that.
Picreel customers consistently see a 15 to 300% increase in inbound leads and conversions after deploying properly targeted popup campaigns.
Method 2: How to Add a Popup in WordPress Without Plugin Using Code
If you want full code-level control, no external dependency, and maximum performance, building a popup from scratch using HTML, CSS, and JavaScript is a solid approach. This is what the WordPress developer community increasingly recommends for simple use cases.
A few things to know before you start:
- Always work in a child theme, not the parent theme. Code added directly to a parent theme gets wiped during updates.
- Use wp_enqueue_scripts to load JavaScript the WordPress-approved way rather than pasting raw script tags.
- The modern HTML5 <dialog> element handles many browser-level modal behaviors automatically, including accessibility and keyboard navigation.
Here is the foundational code you will add to your WordPress site. I will break it into three parts: HTML structure, CSS styling, and JavaScript behavior.
Step 1: Add the HTML Modal Structure
Paste this inside your theme’s footer.php file, just before the closing </body> tag (or use the WordPress Editor approach from Method 1):
| <!– Custom WordPress Popup – No Plugin Required –> <dialog id=”custom-popup” aria-labelledby=”popup-title” aria-modal=”true”> <div class=”popup-inner”> <button id=”popup-close” aria-label=”Close popup”>×</button> <h2 id=”popup-title”>Get Our Free Conversion Checklist</h2> <p>Enter your email and I’ll send it straight to your inbox.</p> <form id=”popup-form”> <input type=”email” id=”popup-email” placeholder=”Your email address” required aria-label=”Email address”> <button type=”submit”>Send Me the Checklist</button> </form> </div> </dialog> |
Step 2: Add the CSS Styling
Add this to your child theme’s style.css file or inside a <style> block in your header. This gives you a clean, mobile-responsive modal starting point:
| dialog#custom-popup { border: none; border-radius: 10px; padding: 0; max-width: 480px; width: 90%; box-shadow: 0 8px 40px rgba(0,0,0,0.2);} dialog::backdrop { background: rgba(0, 0, 0, 0.6);} .popup-inner { padding: 36px; position: relative; font-family: inherit; } #popup-close { position: absolute; top: 12px; right: 16px; background: none; border: none; font-size: 24px; cursor: pointer; color: #555; } #popup-form input[type=”email”] { width: 100%; padding: 10px 14px; margin-bottom: 12px; border: 1px solid #ddd; border-radius: 6px; font-size: 15px; } #popup-form button[type=”submit”] { width: 100%; padding: 12px; background: #f05a28; color: #fff; border: none; border-radius: 6px; font-size: 16px; cursor: pointer; } |
Step 3: Add the JavaScript Trigger Logic
This is where you control when and how the popup appears. Add this either in a properly enqueued .js file or before the closing </body> tag. The example below includes a time delay trigger, cookie management to prevent the popup from firing on every page load, and an exit intent trigger:
| (function() { const popup = document.getElementById(‘custom-popup’); const closeBtn = document.getElementById(‘popup-close’); const COOKIE_KEY = ‘picreel_popup_shown’; const COOKIE_DAYS = 7; // Cookie helpers function setCookie(name, days) { const expires = new Date(Date.now() + days * 864e5).toUTCString(); document.cookie = name + ‘=true; expires=’ + expires + ‘; path=/’; } function getCookie(name) { return document.cookie.split(‘; ‘).some(row => row.startsWith(name + ‘=’)); } function showPopup() { if (!getCookie(COOKIE_KEY)) { popup.showModal(); setCookie(COOKIE_KEY, COOKIE_DAYS); } } // Trigger 1: Time delay (20 seconds) setTimeout(showPopup, 20000); // Trigger 2: Exit intent (mouse moves toward browser tab) document.addEventListener(‘mouseleave’, function(e) { if (e.clientY < 10) showPopup(); }); // Close on button click closeBtn.addEventListener(‘click’, function() { popup.close(); }); // Close on backdrop click popup.addEventListener(‘click’, function(e) { if (e.target === popup) popup.close(); }); // Close on ESC key (handled natively by dialog element) })(); |
Step 4: Add Scroll Depth Trigger (Optional)
If you want the popup to fire after a visitor has scrolled through 50% of the page:
| let scrollTriggered = false; window.addEventListener(‘scroll’, function() { const scrollPercent = (window.scrollY / (document.body.scrollHeight – window.innerHeight)) * 100; if (scrollPercent >= 50 && !scrollTriggered) { scrollTriggered = true; showPopup(); } }); |
Step 5: Show the Popup on Specific Pages Only
Use WordPress conditional tags inside your functions.php (child theme) to control where the popup HTML loads:
| function my_custom_popup_script() { if ( is_single() || is_front_page() ) { // Enqueue your popup JS wp_enqueue_script(‘custom-popup’, get_stylesheet_directory_uri() . ‘/popup.js’, array(), ‘1.0’, true); } } add_action(‘wp_enqueue_scripts’, ‘my_custom_popup_script’); |
This ensures the popup only loads on single posts and the homepage, not on contact pages or admin screens.
Manual Code vs. Popup Tool: Which Method Should You Use?
I get this question a lot. Here is my honest take:
| Factor | Manual Code | Picreel Embed |
|---|---|---|
| Setup time | 1 to 3 hours | Under 10 minutes |
| Coding required | Yes (HTML, CSS, JS) | None |
| Exit intent trigger | Requires custom code | Built-in, one click |
| A/B testing | Manual (code changes) | Built-in A/B Test Trigger Combinations |
| Email integration | Requires custom backend | Direct integration with Mailchimp, Klaviyo, etc. |
| Analytics | External tools needed | Real-Time Analytics built in |
| Multi-site scalability | Copy-paste code | Single account, multiple domains |
| GDPR compliance | Manual implementation | GDPR checkbox built into form builder |
The manual approach is great when you want a simple, one-time popup notice, a basic modal with no email integration, or a lightweight solution for a single site you fully control.
If you need lead capture, cart abandonment recovery, email list growth, or any kind of behavioral targeting across multiple sites, the embed code approach is genuinely faster, smarter, and more maintainable.
Website Conversion Optimization: Making Your Popup Work for SEO
Google penalizes intrusive mobile popups. A popup that covers the main content immediately on page load, especially on mobile, can hurt your search rankings. Here is the checklist I follow before publishing any popup campaign:
- The popup does not fire in the first 3 seconds on mobile.
- The close button is clearly visible and easy to tap on a small screen.
- The popup does not cover the main content on mobile without a clear dismiss option.
- Cookie logic is in place, so the popup does not reappear on every visit.
- The popup does not trigger on internal page navigations.
When you run popups through Picreel, the mobile overlay type automatically adjusts to a mobile-optimized format so you are not accidentally breaking your layout or your rankings.
FREE. All Features. FOREVER!
Try our Forever FREE account with all premium features!
Start Converting the Traffic You Are Already Getting
Most WordPress site owners are sitting on traffic they are not converting. A well-timed popup, whether you build it from scratch or deploy it through Picreel, is one of the fastest ways to start capturing leads, recovering abandoned carts, and growing your email list without spending more on ads.
You do not need a heavyweight plugin for any of it.
If you want the fastest path to a live, high-converting popup campaign on WordPress, start with Picreel’s free plan.
Set up your first campaign in under 10 minutes, connect it to your email tool, and see the conversion data come in through Real-Time Analytics. No plugin installs. No compatibility issues. No site speed hit.
Frequently Asked Questions

Will a popup script slow down my WordPress site?
A properly implemented popup script has minimal impact on performance. Picreel's embed code loads asynchronously and does not block page rendering. For manual scripts, load them in the footer using wp_enqueue_scripts rather than in the header to keep page speed intact.
How do I add exit intent popup in WordPress without a plugin?
With Picreel, exit intent detection is built into the Smart Popup Triggers. With manual code, you detect exit intent by listening for the mouseleave event on the document and checking if the cursor's Y position is near zero, which indicates the user is moving toward the browser tab or address bar.
What is the best popup strategy for email capture on WordPress?
Use a scroll depth trigger set at 50% for blog content, and an exit intent trigger for landing pages. Keep the form to a single email field, write a benefit-driven headline, and tag every subscriber in your email tool by which popup they came from. This improves your welcome sequence targeting and downstream conversion rate.
How do I show a popup only on specific pages in WordPress?
Use WordPress conditional tags like is_front_page(), is_single(), or is_page() inside your functions.php to conditionally load the popup script. With Picreel, you can set page URL targeting rules directly inside the campaign dashboard without touching any code.
How do I prevent the popup from showing on every page reload?
Use cookies or localStorage to store whether the popup has been shown. Set a cookie with an expiry of 7 days, and check for it before calling showModal(). Picreel handles this automatically with its built-in frequency cap settings.
Is it possible to add a WordPress popup without plugin across multiple sites?
Yes. The manual code approach requires you to add the script to each site individually. With Picreel, one account covers multiple domains. You configure campaigns per site from a single dashboard, which is much more scalable if you manage more than two or three WordPress sites.
How do I integrate a WordPress popup with Mailchimp without a plugin?
With Picreel, connect your Mailchimp account from the Integrations panel inside your campaign. Map the email field to your Mailchimp list, and new subscribers sync automatically. For manual popups, you would need to use the Mailchimp API or an embedded Mailchimp form inside your modal HTML.
What is the HTML5 dialog element and why should I use it for popups?
The HTML5 <dialog> element is a native browser element designed specifically for modals and popups. It handles built-in accessibility features like keyboard trapping, ESC key closing, and ARIA roles automatically. Using it instead of a custom <div> modal means less JavaScript and better screen reader support.
Do WordPress popups without plugins work on mobile?
Yes, but they require careful CSS. Your popup container should use max-width: 90% and width: 90%, and your close button should be large enough to tap easily on a small screen. Picreel automatically renders a mobile-optimized overlay format. For manual code, always test on a real mobile device before going live.
How do I create an exit intent popup setup in WordPress without a plugin?
Use Picreel's Exit Intent Triggers for a zero-code setup. For manual implementation, listen for document.addEventListener('mouseleave', ...) and trigger the popup when e.clientY < 10, which captures cursor movement toward the browser bar. Combine with cookie logic to prevent it from firing repeatedly.
What is popup script vs plugin performance difference?
A lightweight inline script or asynchronous embed code consistently outperforms a full plugin in terms of page speed, because plugins often load their entire CSS and JavaScript library on every page, whether the popup is shown or not. Google PageSpeed Insights typically scores cleaner for sites using embed codes or custom scripts over bloated popup plugins.
How do I use GDPR-compliant popups in WordPress without a plugin?
Add an unchecked GDPR consent checkbox to your popup form with a link to your privacy policy. Do not pre-check the box. With Picreel, the GDPR consent checkbox is available as a field option inside the form builder. For manual popups, add the checkbox input in HTML and validate it before processing the form.
Can I run popup A/B testing in WordPress without a plugin?
Yes. With Picreel, A/B Testing is built in. You can test different headlines, CTA copy, colors, and trigger timings within the same campaign. For manual code, you would need to serve different popup variations randomly using JavaScript and track results using Google Analytics custom events, which is significantly more complex.
How do I reduce cart abandonment using a WordPress popup without a plugin?
Use exit intent detection to trigger a discount or free shipping popup on cart and checkout pages. Target only new visitors or visitors who have not converted in the past 7 days to avoid showing the same offer to repeat buyers. Connect the form to your email tool to follow up with visitors who dismissed the popup but did not complete a purchase.
FREE. All Features. FOREVER!
Try our Forever FREE account with all premium features!
 We'd love your feedback!
What did you like & how can we make it even better?
 Thanks for your feedback!
 Ask Your Question
Have a question? Get expert help to make your decision easier.