
Image popups are rarely the real problem. In my experience, poor timing, unnecessary plugins, and unclear intent usually are.
When used correctly, image popups help direct attention to what matters most. But if handled carelessly, they slow sites down, disrupt user experience, and quietly erode trust. This trade-off comes up often in my conversations with founders, CEOs, and marketing leaders who are trying to balance conversion goals with experience.
What I see at the core of these discussions is a simple need. Teams want visitors to view images clearly, grasp context quickly, and notice an update without being forced to fill out a form or dragged into a heavy setup. WordPress, unfortunately, has a habit of turning small requirements into complicated decisions that come with performance and maintenance costs.
When someone questions whether a popup is worth it or whether avoiding plugins is the right call, I don’t see hesitation. I see judgment. Experience, speed, and control matter more than tactics.
In this guide, I break down how to create image popups in WordPress, both without a plugin and with one, focusing on practical execution, restrained UX, and approaches that hold up on serious business websites.
How to Make an Image Popup in WordPress Using a Plugin
If you’re looking for a faster, more flexible way to create an image popup in WordPress, using a plugin is often the smarter choice. It removes the need for custom coding, minimizes technical maintenance, and lets your team launch and test popups quickly without relying on developers.
For most business teams, this approach is more practical and scalable. You can design, adjust, and experiment with different popup styles in minutes.
Tools like Picreel handle the technical side for you, so you can focus on why the popup exists and what outcome it should drive, rather than how it is built.
If you’d prefer to build an image popup without using a plugin, you can find that method explained in the next section.
Below is a clear, intent-first way to approach image popups using a plugin, without turning this into a tool walkthrough.
Step 1: Define the Job of Your Image Popup
Before opening WordPress or any popup builder, like Picreel, get clear on what the popup is meant to achieve. Image popups work best when they serve a single, well-defined purpose.
Common jobs include:
- Redirecting visitors to a specific page, such as a product launch, announcement, or limited-time offer, without collecting data
- Supporting conversions at high-intent moments like cart hesitation or exit intent
- Promoting a strong visual call to action, such as a new collection, webinar, or feature release
Pick one primary goal and make sure it can be measured. A popup without a clear job usually adds distraction instead of value.
Step 2: Choose How You Want to Create the Popup (AI vs Templates)
Once you are clear on the job of the popup, the next decision is how you want to build it. Most image popup wordpress plugins give you two practical paths. The right choice depends on how clearly defined your idea already is.
Option A: Create the image popup using AI
AI-based creation is the better choice when speed matters or when you are still testing what will resonate.
Instead of starting with a blank canvas, you begin by entering your website URL and selecting the purpose of the popup.
Typical options include redirecting visitors to a page, promoting an announcement, increasing engagement, or supporting a sales action. You then answer a few short prompts about the offer and audience.
Based on this input, the AI generates:
- Popup layout suitable for image-led messaging
- Suggested headline and supporting text aligned with the goal
- Clear call to action that matches the intended outcome
It helps you reach a clear, goal-aligned message faster, which you can then refine instead of building everything from scratch.
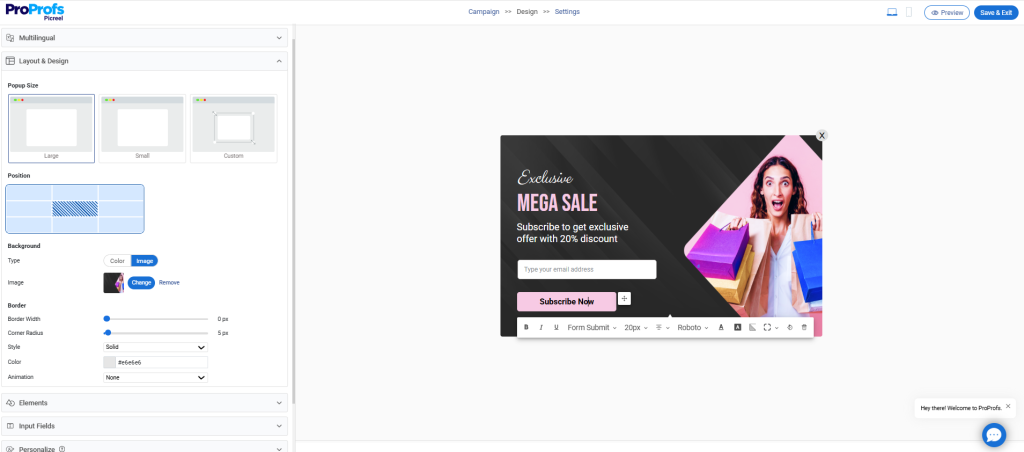
Option B: Create the image popup using ready-made templates

If you already know what you want the popup to do, ready-made templates are the fastest and most reliable way to create an image popup.
For image popups specifically, the format that works best in most business scenarios is a lightbox-style overlay. It places the image front and center, dims the background, and keeps attention focused without permanently blocking the page.
This format is ideal for:
- Product visuals and feature highlights
- Announcements or launches that need attention
- Visual CTAs that lead to another page
Once you select a lightbox image popup template, the setup is straightforward.
You replace the default image with your own visual, update the headline so it clearly explains the value of clicking through, and set a single primary call to action. Everything else, spacing, alignment, responsiveness, and close behavior, is already handled by the template.
Step 3: Build the Core Popup Content
When you are creating an image popup, the image is the message. Everything else exists to support the decision to click.
- Start by selecting a strong, single visual. This should be the first thing the visitor understands. Product screenshots, offer visuals, or announcement graphics work best. Avoid decorative images. If the image does not immediately explain why the popup exists, it should not be used.
- Once the image is set, add a short headline that makes the value explicit. The headline should tell the visitor exactly what happens after they click, not describe the image. Clarity matters more than creativity here.
- Follow this with one supporting line that adds context or urgency. This line should answer the silent question of “why now” without adding more information than necessary.
- Next, include one primary call to action. Image popups perform best when there is a single, obvious next step. Multiple CTAs dilute attention and reduce intent.
- Finally, make sure the popup can be dismissed easily. A visible close option is not optional. It protects trust and ensures that engagement is intentional, not forced.
Step 4: Choose When the Popup Appears (Triggers and Timing)
Only two trigger options consistently work well for image popups: click-based and hover-based. Everything else supports one of these two.
Here’s how to choose correctly.
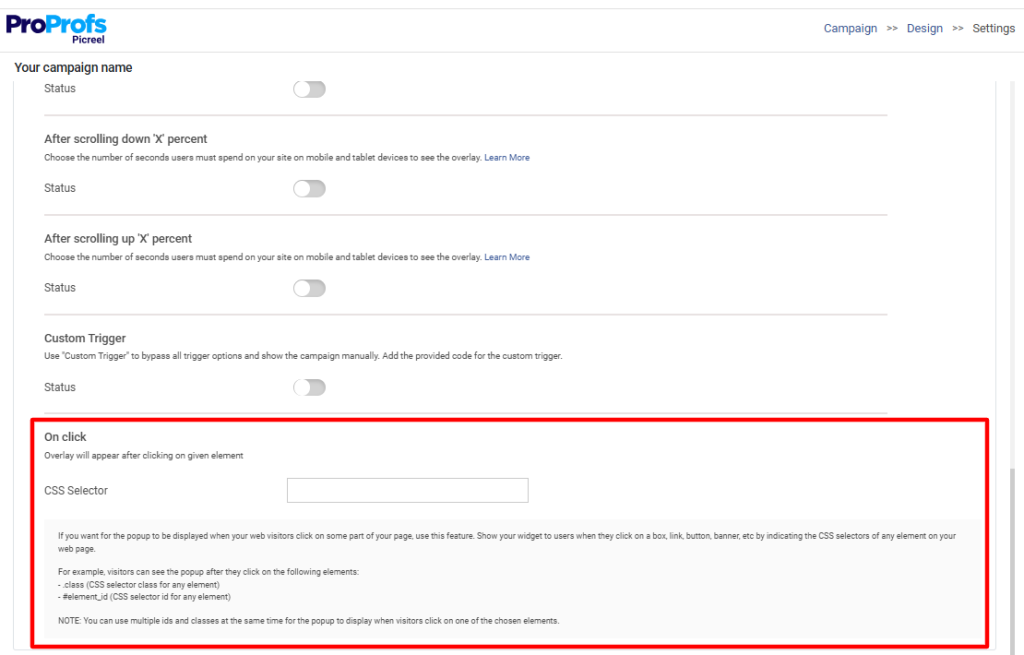
A. For click-based image popups (recommended for most business pages)
WordPress image popup on click works best when the experience needs to feel intentional and controlled. This is the safest and most conversion-friendly option for WordPress sites.
For that, attach the popup to an image, button, or link using a click selector. This ensures the popup opens only when the visitor explicitly asks for it.
B. For hover-based image popups (desktop-only, use carefully)
Hover-based popups should be treated as visual previews, not conversion drivers. They work best when the goal is to show more detail without interrupting the flow.
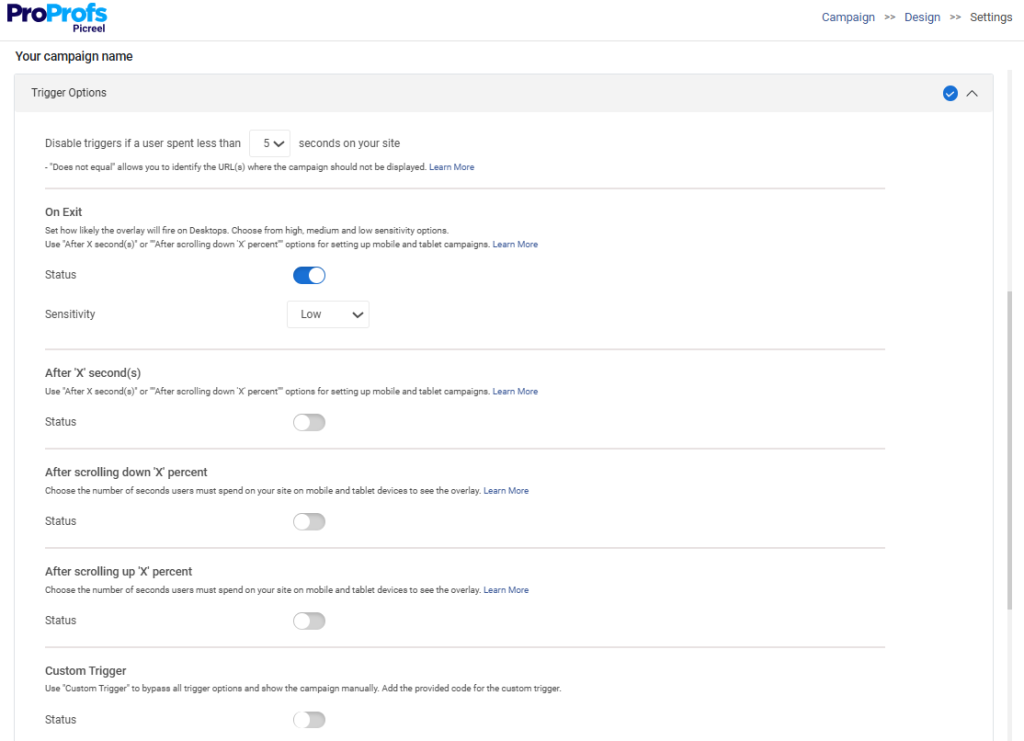
Use these triggers:
- Hover trigger combined with scroll depth or time on page: This ensures the popup only becomes active after the visitor has shown engagement.
- Short delay before hover activation: A slight delay prevents accidental popups as users move their cursor.
Step 5: Decide Who Sees the Popup (Targeting Rules)
For image popups, targeting should reduce noise, not expand reach. Keep the rules simple and intentional.
Use these popup targeting defaults:
- Page-level targeting: show the popup only on pages where the image directly supports the content or offer
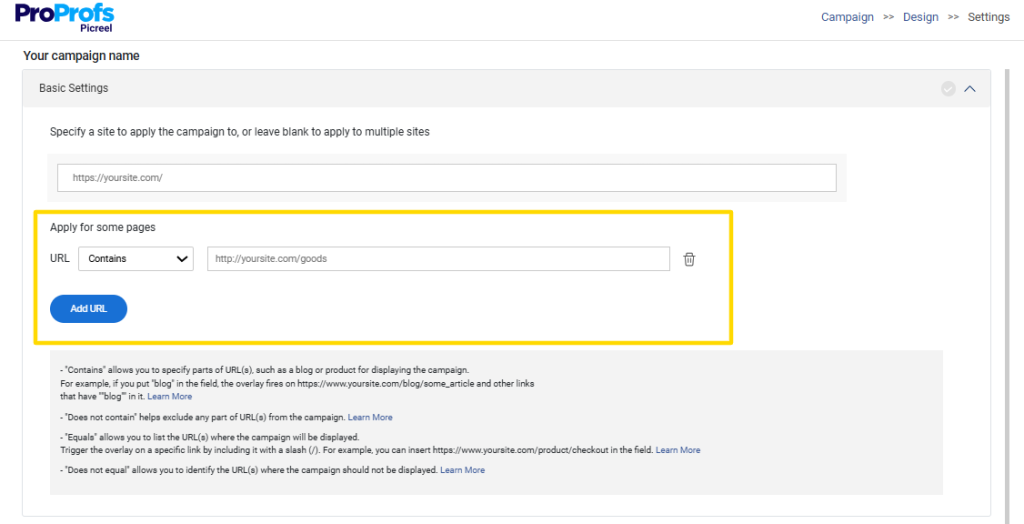
- New visitors first: image popups work best as a first impression, not repeated reminders
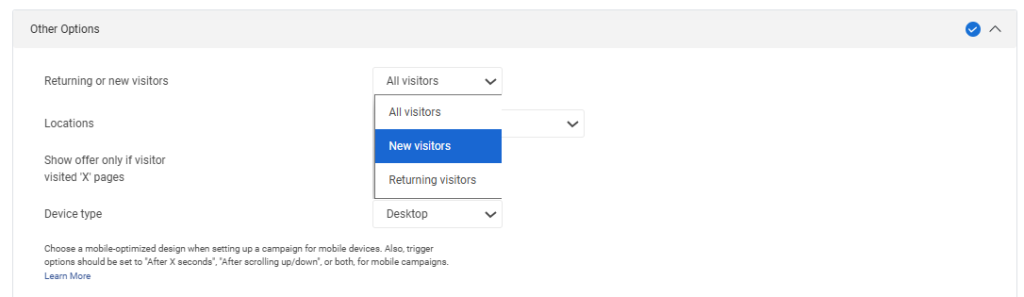
- Frequency capping: limit visibility to once per session or once per day to avoid fatigue
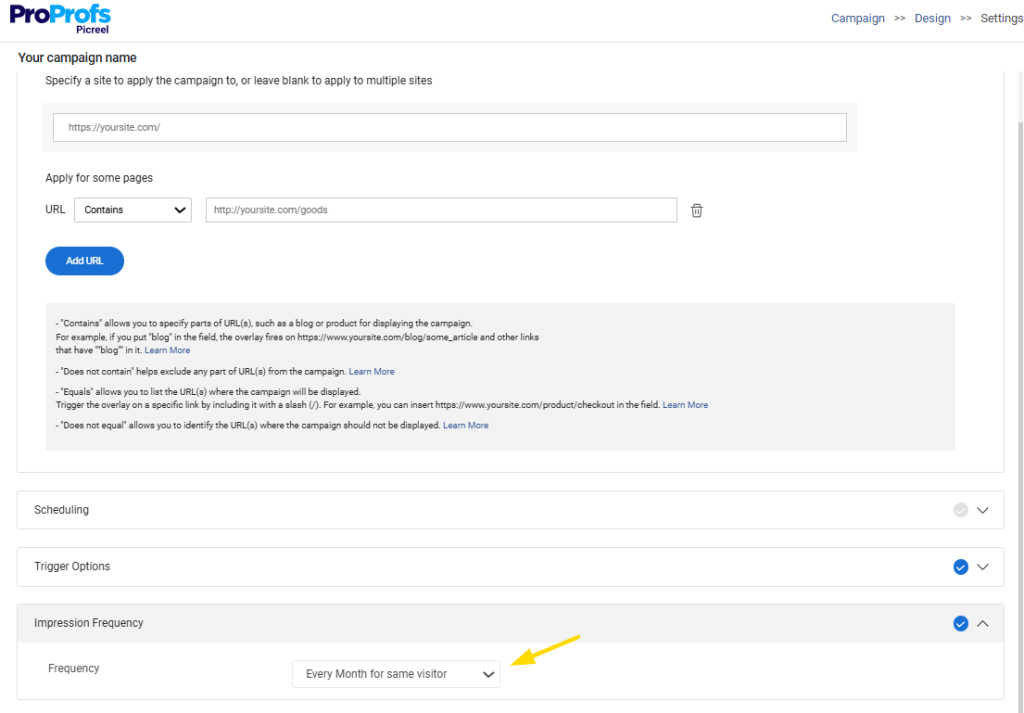
Add advanced targeting only when necessary:
- Location targeting: apply only if the image or message genuinely changes by region
If you manage multiple sites, apply the same rules across domains to stay consistent.
For WordPress image popups, relevance and restraint outperform reach every time.
Step 6: Test the Experience on Real Devices
For image popups, testing is about preventing friction, not chasing perfection. Test only what can break trust or usability.
Before going live, confirm the following:
- Mobile experience works first: the popup opens cleanly, fits the screen, and does not require pinching or awkward scrolling
- Hover behavior does not interfere: hover-based popups stay desktop-only and do not trigger unexpectedly
- Close action is obvious: the close button is visible, tappable, and works instantly
- Navigation stays accessible: the popup does not block menus, headers, or critical page actions
If a popup causes accidental interaction, it is not engaging. It is misleading.
Step 7: Track Performance and Improve
Performance is not about impressions when it comes to image popups. It is about whether the visual moves users to the intended next step.
Track these popup analytics and ignore the rest:
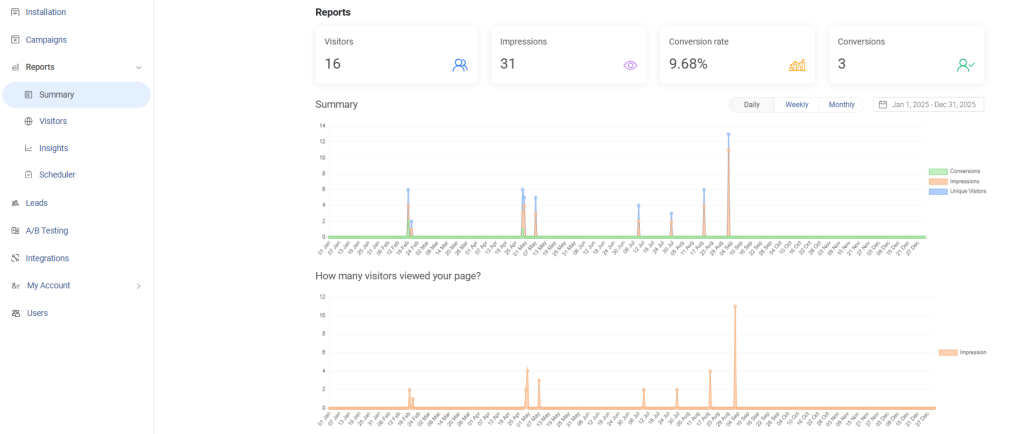
- CTA clicks that lead to the intended page or action
- Conversion rate tied directly to the popup’s goal
- Bounce rate changes immediately after the popup appears
Use A/B testing only where it matters by changing one image at a time, refining headline or CTA wording instead of layout, and adjusting trigger timing rather than popup position.

How to Create an Image Popup in WordPress Without a Plugin
If you want an image popup without adding another plugin to your site, WordPress already gives you everything you need. The process simply involves placing the image on the page, defining how the popup should appear, and deciding what action triggers it.
Let’s start with the most reliable option.
Creating an Image Popup That Opens on Click
This approach is ideal for product visuals, marketing graphics, or any image where you want users to intentionally engage before seeing more detail.
Start by opening the page or post where the image should appear. In the WordPress editor, add a Custom HTML block. This block allows you to place both the visible image and the hidden popup in one place.
Paste the following code into that block:
| <img src=”https://your-site.com/thumbnail.jpg” alt=”Click to enlarge” id=”popupThumb” style=”cursor:pointer; max-width:100%; height:auto;” > <div id=”popupBox” aria-hidden=”true”> |
At this point, the page will show only the smaller image. The larger image is already there, but it remains invisible until it is triggered.
To turn this hidden image into a proper popup overlay, go to Appearance → Customize → Additional CSS from your WordPress dashboard. This is where WordPress lets you control how elements look across the site.
Add the CSS below and publish the changes:
| #popupBox { display: none; position: fixed; inset: 0; background: rgba(0,0,0,0.75); z-index: 9999; padding: 20px; align-items: center; justify-content: center; } #popupBox.active { #popupBox img { #popupClose { |
This styling creates the darkened background, centers the image on the screen, and places a clear close button in the top corner. Without this step, the popup would technically work, but it would not feel polished or intentional.
Next, the popup needs to know when to open and when to close. To do this, return to the same page in the WordPress editor and add another Custom HTML block near the bottom of the page. This block will hold a small script that controls the interaction.
Paste the script below:
| <script> (function () { const thumb = document.getElementById(“popupThumb”); const box = document.getElementById(“popupBox”); const close = document.getElementById(“popupClose”); if (!thumb || !box || !close) return; thumb.addEventListener(“click”, () => { close.addEventListener(“click”, () => { box.addEventListener(“click”, (e) => { |
This script listens for three actions. When someone clicks the image, it opens the popup. When they click the close button or the dark background, it closes again. While the popup is open, page scrolling is temporarily disabled so the focus stays on the image.
Once saved, open the page in a new tab and click the image. The popup should open smoothly and close just as easily.
Creating an Image Popup That Appears on Hover
A hover-based popup is lighter and works well for quick previews, especially on desktop. Since it relies only on CSS, no script is needed.
To set this up, open the page in WordPress and add a Custom HTML block where the image should appear.
Insert the following code:
| <div class=”hoverWrap”> <img src=”https://your-site.com/thumbnail.jpg” alt=”Hover to preview” style=”max-width:100%; height:auto;”> <div class=”hoverPopup”> <img src=”https://your-site.com/full-image.jpg” alt=”Preview image”> </div> </div> |
Here, the larger image is nested inside a container that stays hidden until the user interacts with the thumbnail.
Next, go back to Appearance → Customize → Additional CSS and add this styling:
| .hoverWrap { position: relative; display: inline-block; } .hoverPopup { .hoverWrap:hover .hoverPopup { .hoverPopup img { |
Once published, hovering over the image will reveal the larger preview, and moving the cursor away will hide it again.
From a business standpoint, it is worth noting that hover-based popups work best on desktop screens. If mobile users are a priority, click-based popups offer a more consistent experience.
Best Practices for Image Popups: Accessibility, UX, and SEO
You can build a technically correct image popup and still hurt your site if the experience feels frustrating or intrusive. This is where accessibility, UX, and SEO quietly intersect. When popups go wrong, visitors may not complain, but they leave. And search engines notice.
1. Make the Popup Easy to Control
A good popup should never feel like a trap. Visitors must be able to open it, understand it, and close it without thinking.
That means:
- Keyboard users should be able to navigate the popup without getting stuck
- Pressing the Escape key should close it instantly
- A visible close button should always be present, especially on mobile
When closing a popup feels difficult, frustration rises quickly, even if the content is relevant.
2. Design for Fingers, Not Just Cursors
Many popups look fine on desktop but fail on mobile. Small close icons and tight spacing make it easy to tap the wrong thing.
Buttons and close areas should be large enough to tap comfortably. If users feel forced to zoom or struggle to close the popup, the experience breaks down fast.
3. Understand How Google Views Popups
Google doesn’t hate popups. It penalizes intrusive interstitials that block content, especially on mobile.
Popups that appear immediately on page load or cover most of the screen can hurt rankings. On the other hand, popups triggered by user action or shown at natural moments are generally acceptable.
4. Know When Popups Are Expected
Some popups are not only allowed, but they’re also expected. Cookie consent notices, age verification, and login or gated content popups are standard and rarely penalized when done correctly.
The key difference is intent. These popups support access or compliance, not interruption.
Why This Matters More Than It Seems
When popups ignore accessibility or timing, bounce rates increase. Pages feel heavier. Visitors leave without engaging. Over time, this affects conversions and visibility.
When popups respect control, timing, and context, they stop feeling like interruptions and start feeling like part of the experience.
Top 4 Image Popup Use Cases
Once you move beyond simple image enlargement, image popups can also support marketing goals. The key is restraint. When used well, they guide attention. When overused, they interrupt it. The difference lies in intent and timing.
1. Use Image Popups to Redirect, Not Interrupt
One of the simplest and least intrusive ways to use image popups is for redirection. Instead of asking for an email or pushing a form, the popup simply guides visitors to another page.
This works well when you’re:
- Launching a new product or feature
- Highlighting a limited-time offer
- Sending traffic to a campaign or announcement page
Because there’s no data capture involved, the interaction feels lighter and more respectful.
2. Support Product and Page Promotion Visually
Images can communicate faster than text, especially for products, dashboards, or visual updates. An image popup lets you showcase what’s new without forcing visitors to leave immediately.
Used sparingly, this approach works well for:
- New feature releases
- Updated pricing or plans
- Key landing pages you want more visibility on
The goal is awareness first, not pressure.
3. Get Exit-Intent Popups Right
Exit-intent image popups are often misused. Shown too early or too aggressively, they frustrate users. But when displayed at the right moment, they can recover attention that would otherwise be lost.
A good exit-intent popup:
- Appears only when a visitor is about to leave
- Offers something relevant to the page they’re on
- Makes the next step clear and optional
Think of it as a final nudge, not a last-ditch grab.
4. Reduce Cart Abandonment Without Adding Friction
In checkout flows, image popups can reduce hesitation visually. Instead of more text, use images to reinforce trust or urgency.
This could include:
- A reminder of what’s in the cart
- A limited-time offer or free shipping prompt
- Visual reassurance, like returns or guarantees
When done well, these popups support decisions instead of interrupting them.
FREE. All Features. FOREVER!
Try our Forever FREE account with all premium features!
Create Image Popups That Respect User Intent
Image popups work best when they respect intent, context, and user control. Whether you build one manually or use a plugin, the fundamentals stay the same. The popup should appear at the right moment, communicate value instantly, and give visitors an easy way to move forward or opt out.
Lightweight, standards-based approaches tend to win in the long run because they prioritize experience over disruption. In practice, better timing and relevance consistently outperform louder interruptions or aggressive tactics. Click-based popups for intentional engagement and carefully placed hover previews for desktop users strike the right balance.
If you prefer speed, flexibility, and ongoing optimization without touching code, tools like Picreel make it easier to apply these principles at scale while staying focused on outcomes rather than setup.
Start simple. Test thoughtfully. Let your image popups guide attention, not demand it.
Frequently Asked Questions

Can I add animations or transitions to an image popup without h
Yes. Plugins often include lightweight animation options like fade or zoom that don’t require extra work. If you’re building it with code, stick to simple CSS transitions instead of heavy JavaScript effects.
How do I preload images so the popup opens instantly without lag?
Some plugins automatically optimize loading and cache popup images for faster display. In a custom-coded popup, you’d need to preload the full-size image using browser preload hints or hidden loading techniques.
Should image popups be indexed by search engines?
Most plugin-based popups aren’t indexed because they’re overlays, not separate pages. With custom code, it’s still best practice to keep popup content supplemental and ensure the main page holds the SEO value.
How do I make an image popup accessible for screen readers?
Good plugins include accessibility features like ARIA labels, keyboard navigation, and proper close behavior. If coding manually, you must add these yourself, including Escape-key support and focus management.
What image size and format work best for popup performance?
Plugins often compress and serve images efficiently, especially if paired with optimization tools. If you’re coding it yourself, using WebP formats and keeping file sizes small is essential to avoid slowing down the site.
Can I use image popups on WooCommerce product pages without disrupting checkout flow?
Yes. Plugins let you target popups only on product pages and exclude checkout automatically. With custom code, you’d need conditional logic to prevent popups from firing during high-intent flows like checkout.
How do I implement image popups across multiple WordPress sites consistently?
Many plugins support multi-site setups or let you reuse the same popup template across domains. If coding manually, you’d need to replicate the HTML/CSS/JS across each site and maintain updates yourself.
What is the difference between a lightbox image popup and a modal popup?
Most plugins offer lightbox templates specifically for image-focused popups, while modals can include forms or richer content. In custom code, the difference comes down to structure: lightboxes are simpler overlays, modals are more interactive containers.
How do I measure the real business impact of an image popup beyond click rate?
Plugins often include built-in analytics and conversion tracking, so you can see what users do after interacting. With custom code, you’d need to integrate tracking manually through GA4 events or tag manager setups.
FREE. All Features. FOREVER!
Try our Forever FREE account with all premium features!
 We'd love your feedback!
What did you like & how can we make it even better?
 Thanks for your feedback!
 Ask Your Question
Have a question? Get expert help to make your decision easier.